|
|
BRITISH AUTOMOTIVE |
|
www.mgbmga.com MGTD Articles |
TELESCOPIC SHOCK ABSORBERS
Last Updated 03/21/01
If you are converting your OEM rear shock absorbers to the telescopic type, please take a moment to read the following information on British Automotive's part VBPBA1.
| Dimensions | |
| Compressed Length | 10" |
| Extended Length | 15.7/8" |
| Working Length | 5.7/8" |
| Ideal Installed Height | 12.15/16" |
| Ideal Bump Travel | 2.15/16" |
| Ideal Rebound Travel | 2.15/16" |
Since part VBPBA1 contains no provisions for a bump stop, it is critical that the shock absorbers be installed correctly, otherwise, damage will occur.
1. Before removing your OEM shock absorbers from your vehicle, measure the standing distance from the shock absorber center arm pivot to the center of the lower shock absorber link attachment plate hole. Add 3'" to this measurement. Vehicle must be on all four wheels. Use of vehicle hoist or 4 wheel ramps is ideal.
This 3" additional measurement allows for the upward offset (1") of the new upper mounting bracket and the 2" downward offset, which is caused when switching the lower attachment plates from side to side.
This total measurement will be the initial installed height. Compare this with the IDEAL INSTALLED HEIGHT measurement.
2. Measure the distance between the bump stop and the axle bump stop plate. This measurement will be the bump travel distance. Compare this with the IDEAL BUMP TRAVEL measurement.
There is a direct relationship between these 2 measurements. Recently, while adapting this type of shock absorber to an MGA, we found that with an initial installed height of 13.5" we had a bump travel distance of 2.5". Increasing either of these measurements proportionally increases the other measurement. Likewise, decreasing either of these two measurements proportionally decreases the other measurement.
We know that the above only applies if the shock absorber was mounted vertically. However, having the shock absorber installed at an angle creates an operating safety margin when using this measurement method.
A minimum bump stop travel distance of 2.5" should be maintained where possible. Less than this distance will cause premature contact between the axle bump stop plate and bump stop assembly, resulting in possible "oversteer " conditions. To increase the bump travel distance would require the installation of new OEM steel springs. British Automotive also has an adjustable rear shackle part RRHASK which effectively will raise your vehicle rear ride height by approximately 1/2" or 1". This kit is designed for use with OEM steel springs only. Installation of this product would then directly increase the BUMP TRAVEL distance by approximately the same amount.
In cases where this measurement is greater than the IDEAL BUMP TRAVEL i.e. 2.15/16" care should be taken so that the shock absorber does not bottom out. We have either one of two methods to resolve this problem:
1. Increase the shock absorber installed height distance.
2. Reduce the vehicle rear ride height.
1. Increasing the shock absorber installed height distance can be accomplished by installing British Automotive's stackable 1/2" spacer blocks between the lower nylatron spring seating pad and the "U" bolt guide plate. Your original "U" bolts should be able to accommodate at least one 1/2" spacer block. To this end, we supply one 1/2" spacer block per side with the shock absorber kit. Should you require to install more than one spacer block then you will have to order additional spacer blocks as well as British Automotive's longer "U" bolt set part AHH6452/A (8.5" Length).
Note: Increasing the shock absorber installed height distance beyond that of the IDEAL INSTALLED HEIGHT distance will effect the IDEAL REBOUND TRAVEL distance.
2. Reducing the vehicle rear ride height may be something you may, or may not want to do. I will mention it here for those who wish to do so. The aforementioned 1/2" stackable spacer blocks can be fitted between the upper "U" bolt guide plate and the upper nylatron spring seating pad. Since we are working with a one to one ratio, the rear ride height will be reduced by the same amount as the spacer block(s) thickness. "U" bolt requirements would be as per the previous paragraph.
Moving on, the IDEAL REBOUND TRAVEL, under normal circumstances, is controlled by the axle check strap (OEM 9" length). Under unrestricted axle droop conditions the check strap length will grow to approximately 9.5"- 9.5/8" in length. Therefore, it is extremely important that these straps be in good condition. The ideal situation is for the axle check strap to be supporting the rear axle, and not the shock absorber. New axle check straps are available under part AHH5081. Also available are shorter axle check straps part AHH6355 (8.5")
Note: For full axle droop to occur, the road wheel(s) would have to be clear of the ground. This situation should not occur under normal driving conditions. Also, the exhaust system, in many cases, prevents this from occurring on the drivers' side (LHD).
3. The next step is to jack up the vehicle and support with jack stands under the. chassis. Make sure that the exhaust does not interfere with the axle tubing on the drivers' side (left-hand drive). Where possible the axle tubing must be fully supported by the axle check straps.
Measure the distance from the shock absorber center arm pivot to the center of the lower shock absorber link attachment plate hole. This measurement should be within the shock absorber EXTENDED LENGTH of 15.7/8". Try and achieve this measurement by using the shorter axle check straps part AHH6355 if necessary.
The image below shows the components that make up the shock absorber kit. Not shown are the "U" bolt nylok nuts (8), which are provided with your kit.
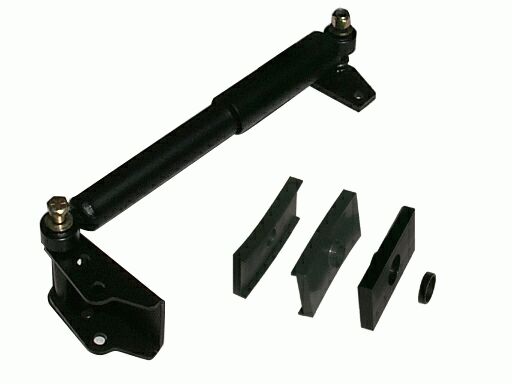
This shock absorber kit contains the following:
Upper Shock Absorber Mounting Bracket (2)*
Modified Lower Shock Absorber Mounting Bracket (2)*
*(Includes mounting hardware)
KYB Gas Charged Telescopic Shock Absorber (2)
Nylatron Spring Seating Pad (4)
1/2" Spacer Block (2)
Adapter Ring (2)
3/8" SAE Nylok Nut (8)
The image below shows additional components that may be required to complete the installation of the shock absorber kit. Not shown are additional 1/2" spacer blocks part SPCR/BLOCK with part PLSTC/RING.

From left to right as follows:
| Part No. | Description | Price |
|---|---|---|
| AHH6452/A | 8.5" "U" BOLT (4) | $35.92 |
| NLNZ83824 | 3/8" NYLOCK NUT (8) | 5.84 |
| AHH6355 | 8.5" AXLE CHECK STRAP (2) | 14.32 |
| AHH5081 | 9" OEM AXLE CHECK STRAP(2) | 16.10 |
Also available:
| Part No. | Description | Price |
|---|---|---|
| SPCR/BLOCK | 1/2" SPACER BLOCK(2) | 21.00 |
| PLSTC/RING | ADAPTER RING(2) | 5.92 |
Insallation Instructions
Using your MGA workshop manual as a guide, carry out the following instructions.
1. Jack up vehicle and support with axle stands under the axle tube.
2. Remove road wheels.
3. Detach the OEM shock absorber links from the lower attachment plates.
4. Remove both axle check straps.
5. Remove exhaust center and rear mounts, support exhaust system with mechanics wire or bungee cords.
6. Jack up vehicle again and support with axle stands placed just forward of the front spring eye mounting.
7. Release jack so that both road springs are supporting the axle tubing.
8. Remove both OEM shock absorbers.
9. Remove L/H or R/H "U" bolts and discard lower attachment plate and spring seating pads.
10. Install new nylatron spring seating pads to spring.
11. Install, as determined, the 1/2" spacer block(s) on the upper nylatron seating pad or the lower nylatron seating pad followed by the "U" bolt guide plates.
12. Install "U" bolts through the upper and lower guide plates, then attach the modified lower attachment plate. Install "U" bolts nuts and tighten. DO NOT OVERTIGHTEN
13. Carry out instructions 9-12 for the opposite side.
14. Attach the new telescopic shock absorbers to the upper mounting brackets. Do not fully tighten at this stage. Install brackets using your original hardware.
15. Jack up vehicle and support with axle stands placed under the axle tube.
16. Install axle check straps.
17. Install shock absorber lower attachment plate bolts, washers, tubes and nylok nuts. Do not fully tighten at this stage.
18. Jack up vehicle, remove jack stands and lower vehicle on ground.
19. Final tightening of shock absorbers should be done with the vehicle on all 4 wheels.
Note: The switching from side to side of the lower shock absorber attachment plates is common with other Vendor supplied shock absorber kits. We have found this seemingly simple change from side to side to be inadequate on two points.
1. There is no chamfer register machined on the other side of the attachment plate. This register allows centralization of the attachment plate with the "U" bolt guide plate.
2. There is tendency for the attachment plate to splay outwardly.
We have rectified these problems with a stronger redesigned lower shock absorber attachment plate. This attachment plate is supplied as part of the shock absorber kit.
WARNING! WARNING! WARNING!
Shock absorbers damaged due to incorrect installation will not be accepted for warranty return.
Before installing your shock absorber kit follow the instructions per KYB.
With the shock absorber in the vertical position, fully compress the unit, then allow the shock absorber to fully extend (you may need to assist this action by pulling slowly downward). This cycle should be repeated at least 6 times.
KYBs' explanation is as follows:
During shipment it is almost certain that the shock absorbers will not remain in the vertical position. This situation leads to unequalization of the nitrogen head pressure. However, self-equalization will occur when the shock absorbers are installed to your MGA.
You might ask "Couldn't I just simply install the shock absorbers and let the suspension movement take care of the problem?" The answer is a emphatic "NO"! Until the nitrogen head pressure is equalized you have no or very little dampening effect. This would be equivalent to sending the customer out of the shop with no shock absorbers installed at all.
If you ignore the KYBs recommendations, there is no guarantee how long this equalization will take. Furthermore, the ramifications of driving your MGA without properly installed shock absorbers are potentially severe. We can't emphasize enough how important it is that you follow the preceding instructions.